22 Aug 2022
Min Read
DeltaStream 101
Table of contents
DeltaStream is a serverless stream processing platform to manage, secure and process all your streams on cloud. One of the main goals of DeltaStream is to make stream processing fast and easy by providing a familiar SQL interface to build real time streaming applications, pipelines and materialized views and eliminating the complexity of running infrastructure for such applications.
This is the first blog post in a series where we will show some of the capabilities and features of DeltaStream platform through real world use cases. In this post, we will use a simple clickstream analytics use case.
Imagine we have a stream of click events continuously appended to a topic named ‘clicks’ in our production Kafka cluster. The following is a sample click event in JSON format:
Let’s assume we have a new project to build where we will compute different metrics over the click events in real time. We prefer to build our project on a separate Kafka cluster since we don’t want to make any changes or write any data into the production Kafka cluster while developing our new application. Also let’s assume our Kafka clusters are on Confluent Cloud and DeltaStream can access these clusters through their public endpoints (in future posts we will show how to configure private-link for such connectivity). And finally, we want to have the results in protobuf format.
DeltaStream has a REST API with GraphQL where users can interact with the service. We provide a Web-based client along with a CLI client, however, users can also directly interact with the service through the REST API. In this blog we will use the DeltaStream CLI and we assume we have already logged into the service.
For our clickstream project we will:
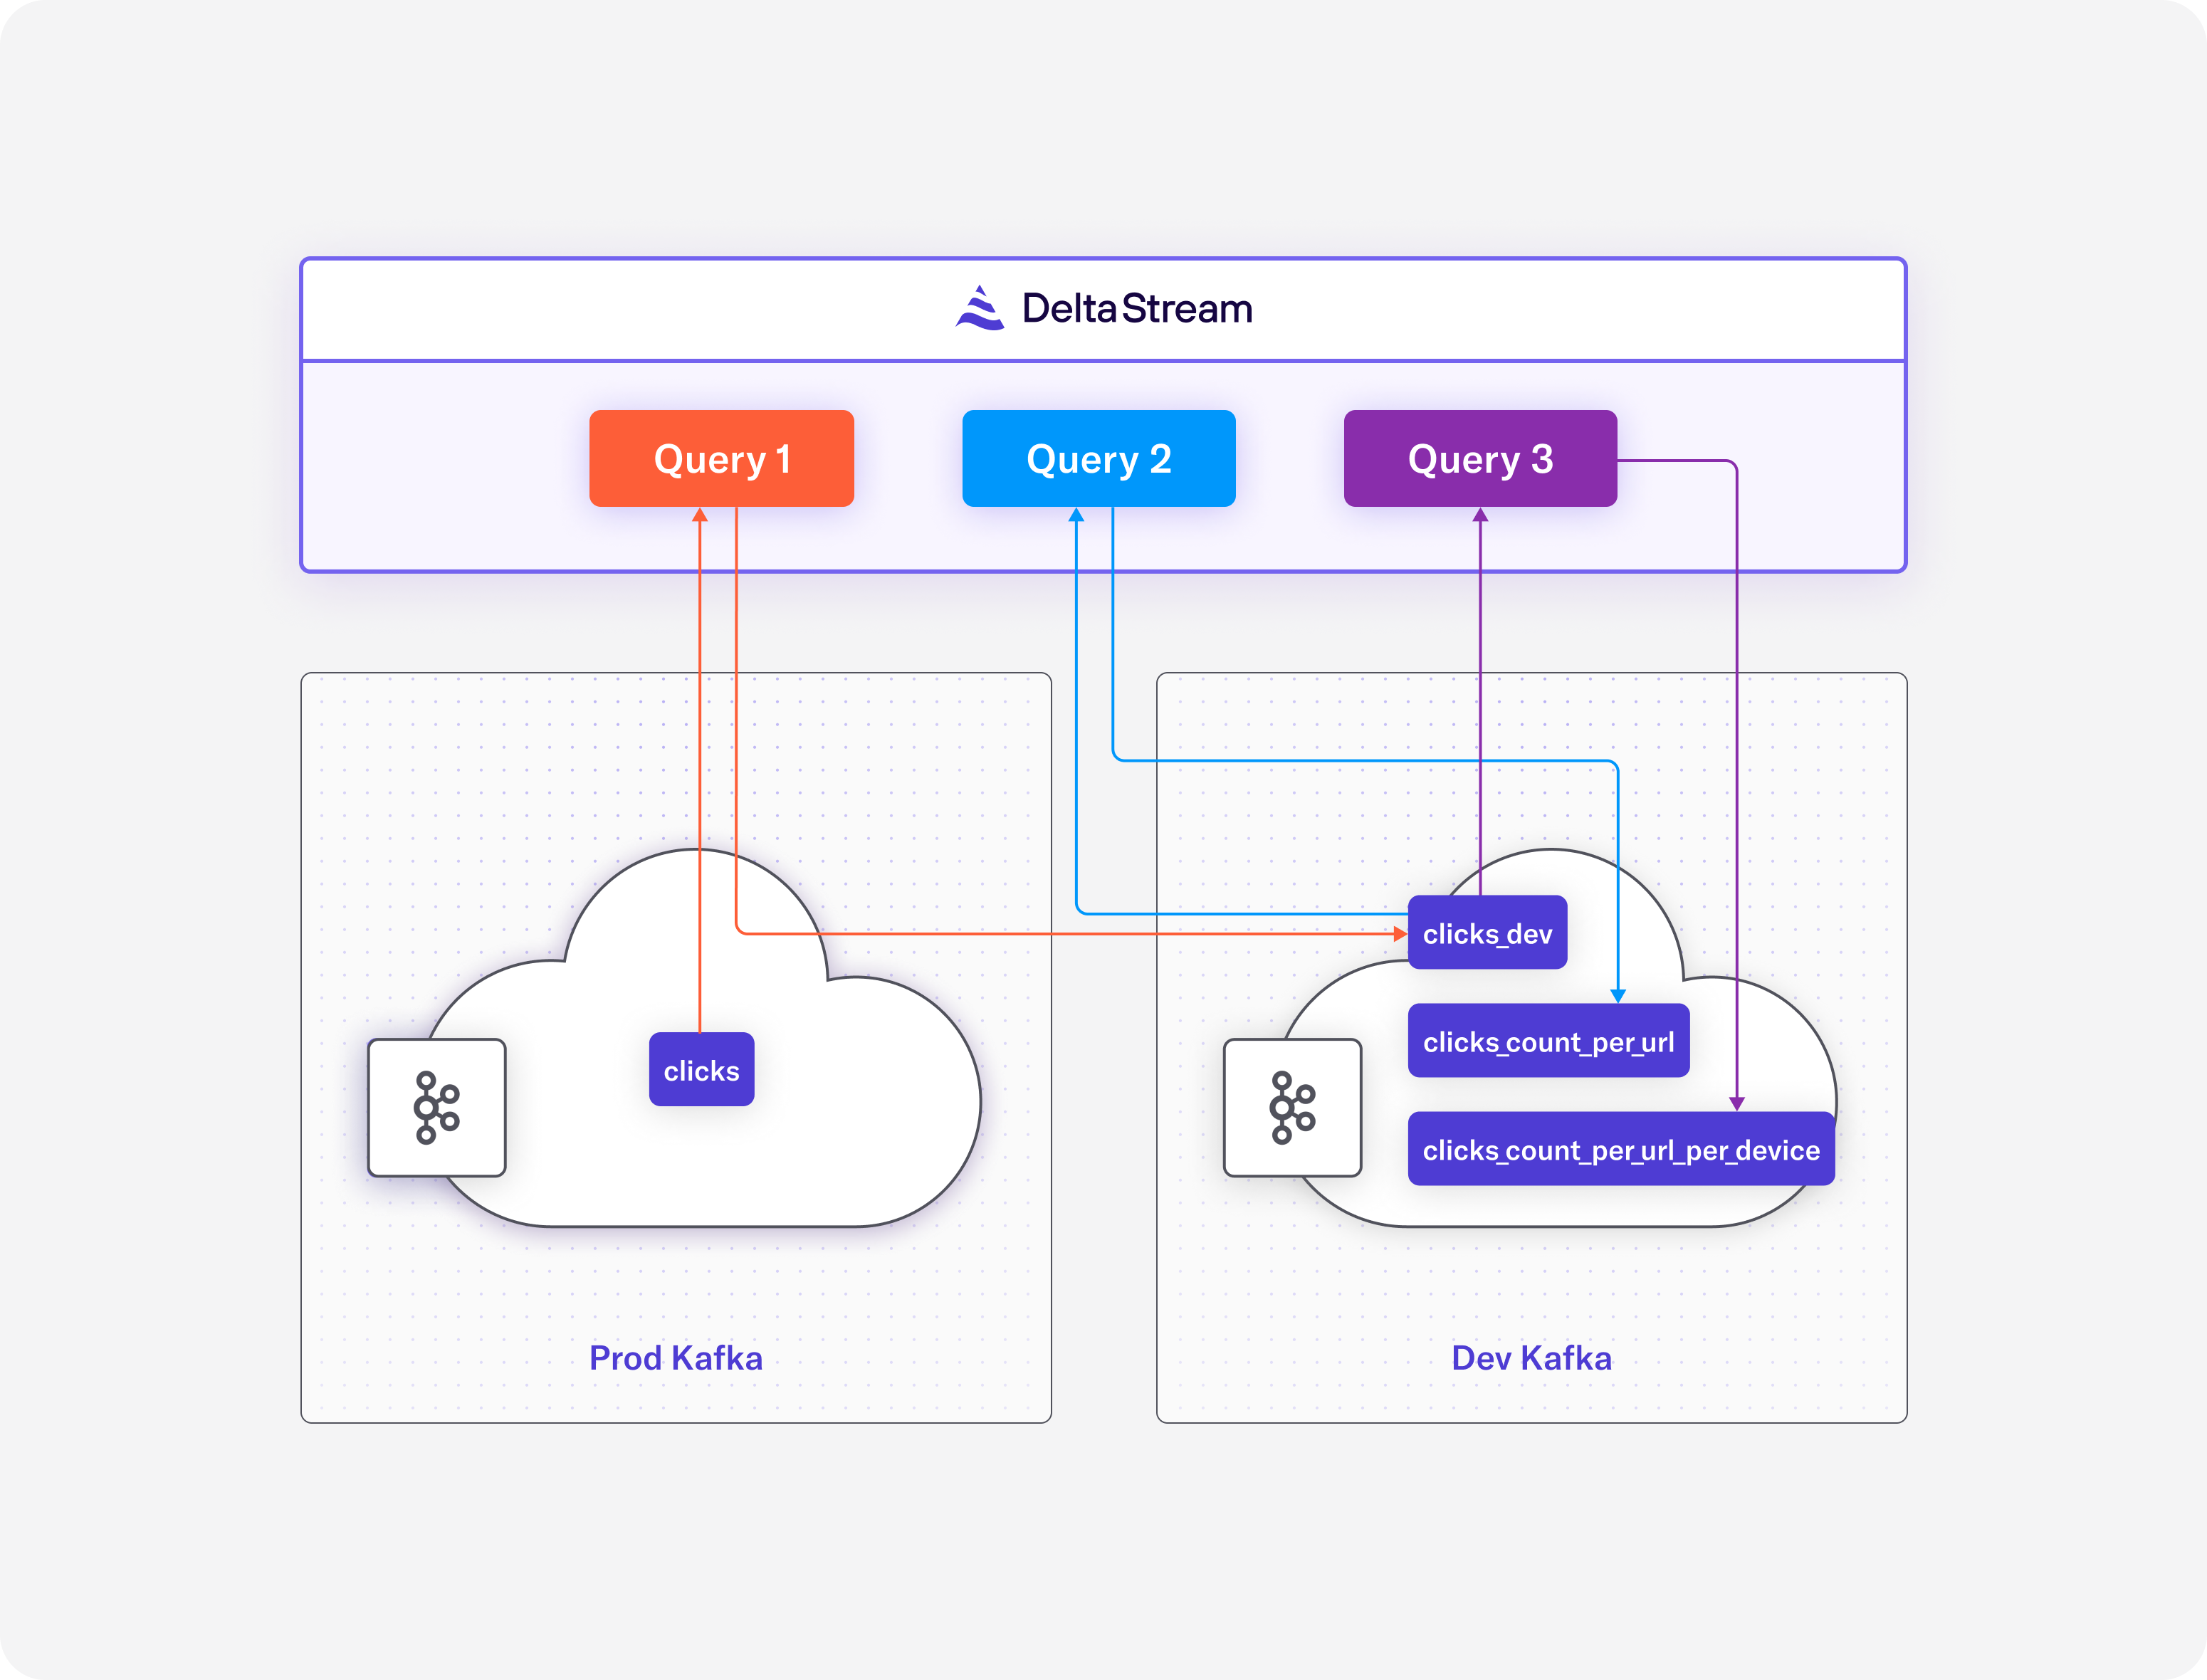
- Replicate the clicks events from the production Kafka cluster into the development Kafka cluster along with the following changes:
- Convert the event_time to timestamp type
- Drop ip field
- Filter events that have desktop device id
- Convert the format to protobuf
- Compute the number of events per url using a continuous query
- Compute the number of events per url and device id using a continuous query
The following figure depicts a high level overview of what we plan to accomplish. Query1 will perform the first item above, Query2 and query3 will perform the second and third bullet points above.

Create stores
The first step in DeltaStream to access your data in your streaming storage service such as Kafka cluster is to declare stores. This can be done using the create store statement. In our project, we have two Kafka clusters, so we will declare two stores in DeltaStream. A store in DeltaStream is an abstraction that represents a streaming storage service such as Apache Kafka cluster or AWS Kinesis. Note that DeltaStream does not create a new Kafka cluster in this case and simply defines a store for an existing Kafka cluster. Once you define a store, you will be able to explore the content of the store and inspect data stored there.
The following statements declare our production Kafka cluster. A store has a name along with the metadata that will be used to access the store.
We also need to declare a store for our development Kafka cluster.
Now that we have declared our stores, we can inspect them. In the case of Kafka stores, for instance, we can list topics, create and delete topics with desired partitions and replication factors and print the content of topics. Note that we can only perform these operations on a given store if the authentication and authorization we provided while declaring the store has enough permissions to perform these operations.
As an example, the following figure shows how we can list the topics in the production Kafka cluster and print the content of the clicks topic.
Once we have our stores declared and tested, we can go to the next step where we will use the relational capabilities of DeltaStream to build our clickstream analysis application.
Create databases and streams
Similar to other relational databases, DeltaStream uses databases and schemas to organize relational entities such as streams. The first step of using relational capabilities of DeltaStream is to create a database. For our clickstream analysis application, we create a new database using the following statement.
Similar to other relational databases, DeltaStream creates a default schema named ‘public’ when a database is created. Once we create the first database in the DeltaStream, it will be the default database. Now we can create a stream for our source topic which is in our production Kafka cluster. The following statement is a DDL statement that declares a new stream over the clicks topic in prod_kafka store.
Queries
Once we declare a stream over a topic we will be able to build our application by writing continuous queries to process the data in real time.
The first step is to transform and replicate the clicks data from the production Kafka cluster into the development Kafka cluster. In DeltaStream, this can be easily done with a simple query as the following.
The above query creates a new stream backed by a topic named clicks_dev in the dev_kafka cluster and continuously reads the clicks events from the clicks stream in the production Kafka cluster and apply the transformations, projection and filtering and writes the results into the clicks_dev stream.
Now that we have the clicks_dev we can write aggregate queries and build the results of these queries in the dev_kafka Kafka cluster. The first query will create a CHANGELOG that continuously computes and updates the number of events per url.
Finally, the following query computes the number of visits per url and per device.
In this blog post, we showed how you can build a simple clickstream analytics application using DeltaStream. We showed DeltaStream’s capabilities of reading from and writing into different streaming data stores and how easily you can build stream processing applications with a few SQL statements. This is the first blog post in a series where we will show some of the capabilities and features of DeltaStream platform through real world use cases. In future posts we will show more capabilities of DeltaStream in building, managing and securing real-time applications and pipelines. In the meantime, if you want to try this yourself please request a demo.


